Pages

Showing posts with label flowers. Show all posts

Sunday, July 8, 2018

My Favorite Things ~ Summer School

Hello Crafty Friends,

My daughter and I decided to go back to school last night...that is at My Favorite Things. You are never too old to learn and that is exactly what I was determined to do...learn some new techniques and tips. We read all five of the posts, watched every video, and created a card for each lesson.  Phew! I think my brain is full of LOTS of new information that will be useful for many future projects.

Here are all the completed assignments...
The idea of white space doesn’t refer to a primarily white card 
 but rather, the idea of leaving a significant portion of your design open, free from embellishment, allowing your focal point to truly shine.

 Primary colors are among the first we learn as kids and for that reason, sometimes have a bad rap as being a childish choice for projects. Really though, primary colors are essential. Not only do they provided the basis for our other colors, they also impart such a playful cheeriness (kid card or not) that they shouldn’t be overlooked.

Repetition reinforces a theme within your projects. Switching things up — either by introducing another color or including an unexpected element into a recognizable pattern, keeps the overall look interesting.

Complementary colors refer to colors that are opposite each other on the color wheel — yellow-purple, red-green, and orange-blue being the traditional complementary pairings.

 
 Symmetry refers to positioning your elements mirrored across an imaginary line that divides your project into even segments. It’s a great method for achieving balance in your design and is a reliable means of laying out your card elements when you don’t have a lot of planning time to spare.

Feeling accomplished!

Now that all those assignments are complete, time to move on to another task!
Stay Creative,
Georgiana 

Wednesday, May 30, 2018

Flowers at Pause Dream Enjoy

Happy Wednesday! 
The challenge at Pause Dream Enjoy begins today. 

This Week's Challenge...
~ Flowers ~
My first thought was April showers bring May flowers. Our April was quite dry and May has been super wet, but my flowers are blooming. I just wish I could be outside more to enjoy them.

Here is my Design Team project...
I pulled out my Rubbernecker Stamps ~ Flower Group #922 and new Caribbean Brights Color Burst powders (Fuschia and Orchid) to create this trio. The cardstock is by MFT ~ Razzle Berry and Grape Jelly and the watercolor paper is by Canson. It is not my favorite because it is not pure white, but it is thick and works well.

The MFT Stitched Rectangle Frame gives the card a more elegant, finished look. The MKC butterfly was cut on my Cameo. The stamped sentiment is from MFT ~ Tickled Pink set.
Other Challenges:

Hope you will join us at Pause Dream Enjoy this week for our "Flowers" challenge. Be sure to check out the other DT projects.

If you like what you see, please become a follower. Leave me your blog name and I will stop by to see what you have been making! Since I am off for summer vacation, I have plenty of time to visit. 

Tuesday, March 20, 2018

Smell the Flowers at Die Cuttin' Divas

Hello Diva Fans!
Welcome back to Carson's Creations and thanks for stopping by!
Today I am sharing the new challenge at Die Cuttin' Divas.

This Week's Challenge...
~ Flowers ~

Here is my Design Team project...
Today is the first day of Spring, so I am hoping to see more flowers bloom in the upcoming week or two. I wanted to create a CAS card for this week's challenge and decided that yellow flowers would brighten someone's mood. The diagonal strip background, You die with coordinating stamp, gerber daisy, and vintage flourish are all by My Favorite Things. 
Hope you will join us at Die Cuttin' Divas this week for our "Flowers" challenge. 

Stay Creative,
Georgiana

Friday, July 21, 2017

I Can't Thank You Enough at Eyelet Outlet and Brads

Happy Friday Everyone!
Today is my second to last day to post at Eyelet Outlet and Brads since my term will be complete at the end of July and I am showcasing a few different products from the shop.

Here is my Design Team project...
I am still trying to add some thank you cards to my stash. When I go back to school in two weeks I want to be able to give a card to the parents that send in items from the class wish list. Due to budget cuts, our class supply orders were cancelled and I am going to be appreciative of anything that I can get for the students. 

I used the following sketch from Freshly Made Sketches.

I layered the light purple flowers and added a round daisy brad in the center. Both the flowers and brads come in a variety of colors. The flower was adhered with a 1/2" Glue Dot.

The background was created using MFT periwinkle ink and a splatter stamp from the Distressed Patterns set. The stamped sentiment is by My Favorite Things ~ Thank so Very Much set and the heart enamel dots are from Eyelet Outlet and Brads.

I used the following products from Eyelet Outlet and Brads shop.

Eyelet Outlet and Brads has a wide variety of products! Why not check them out today.
Stay Creative,
Georgiana

Monday, July 17, 2017

I'm Guest Designer at Connie Can Crop

Hello Crafty Friends,
Happy Monday! 
Today I am the Guest Designer at Connie Can Crop and I am super thrilled to have been asked. What a fabulous opportunity to share with others.

The challenge...Use Your Stash.
Perfect! I have plenty of crafty supplies that need to be used.

Here is My Guest Designer project...
I created a matching tag and card for my one of my very good teacher friends that has been my walking buddy all summer.  We meet almost every day at 6:15am and walk for one hour (which is about 3.6 miles). We talk about anything and everything. Lately we have been on a healthy food kick, so I bought her a salad cookbook, which will go with this set. 

First, I started with the tag. The base and sentiment is by Jaded Blossom and then I stamped all fab flowers by Lawn Fawn. The 3 Girl JAM ribbon was in a plastic container in the closet and I was glad to be able to use it with these purple flowers.   

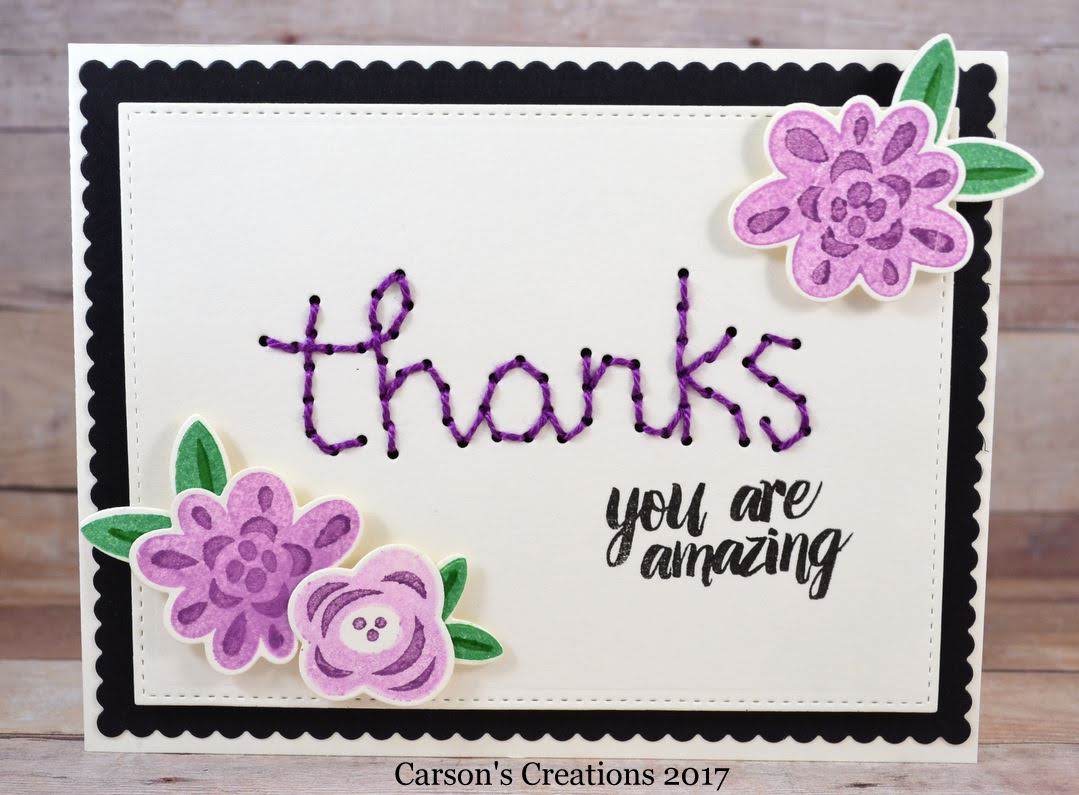
I created the card next. I decided to use the scallop rectangle mat and then I used my Cuttlebug to die cut the embroidered thanks into the cream card stock. Instead of embroidery floss, I used purple craft thread since I have a bunch in my stash. I did watch a video to make sure I was sewing in the correct direction.

The stamped sentiment is by Jaded Blossom ~ Encouragement stamp set.

Thanks Connie for allowing me to be your Guest Designer. Looking forward to next time.
Stay Creative,
Georgiana 

Wednesday, June 14, 2017

Paper Play Sketches Color Challenge

Happy Wednesday All!
We are half way through another week and it sure has been a productive one. I am pleased to be able to share our weekly challenge at Paper Play Sketches this week because I love the color combination.

This Week's Challenge...

Here is my Design Team project...
When I saw these colors I remembered I had a paper stack in my stash that would match perfectly. After retrieving it (Tell Your Story by Teresa Collins) from the shelf, I was a bit disappointed  because I didn't have many sheets to choose from. I had used quite a bit of the stack, but I was able to find a few pieces that layered nicely.

The Happy Wishes die is by WPlus9, the flowers are by Recollections, and the Clover Skittles are by DoubleClick.

Now, I hope you will  join us this week for the Paper Play Sketches challenge. Be sure to visit the other Design Team members to see how they used the colors.

Stay Creative,
Georgiana

Tuesday, June 13, 2017

Camp Create Day 2: Remarkable Resist

Hey Everyone,

This is my second post for today since I am participating in My Favorite Thing's Camp Create (just scroll down for my Die Cuttin' Diva challenge). Today is Day 2 and the technique is Remarkable Resist.

I began by choosing my background stamp (MFT Fine Chevron) and then heat embossed the pattern on Tim Holtz watercolor paper. I used my Gansai Tambi watercolors to add the blue. I trimmed the paper with MFT Blueprints 13 stitched rectangle die.

I typically use solid color cardstock for dies, but after watching Stephanie's video I used my Tim Holtz distress inks for the flower and leaves. The flower base is Spun Sugar, the top is Picked Raspberry, and the leaves are Shabby Shutters.  The stamped sentiment is by Jaded Blossom.

Here is Tuesday's badge!

Looking forward to Camp Create ~ Day 3.

Until tomorrow,
Georgiana

Tuesday, May 2, 2017

May Sketch at Die Cuttin' Diva ~ Watercolor Flowers for You

Hello Crafty Friends,
It's Tuesday, which is our first of two FCAT Science days. I am being quite optimistic that my students do well since we have covered so much Science this year. Results will not be in for a month or longer, so the wait is going to be agonizing.

It is also Die Cuttin' Diva challenge day.

This Week's Challenge...
~ May Sketch ~
You can rotate or flip just as long as the layout is noticeable.

Here is my Design Team project...
I bought this Stampendous stamp this past weekend, so I could work on some watercoloring. First I stamped the image on watercolor paper and then used my Gansai Tambi paints. I cut the centered image with a MFT die.

I added a bit of Wink of Stella glitter to the roses.

The stamped sentiment is by Cardz TV.
I hope you will join us at Die Cuttin' Divas this week for our "May Sketch" challenge. Be sure to check out the other design team projects.

Stay Creative,
Georgiana

Sunday, March 19, 2017

Deliciously Colorful Day at Eyelet Outlet

Hello Everyone!
Today is my day to post at Eyelet Outlet and Brads. Before I share my design team project,  I want to let you know that there is a Daily Deal where you can get a product each day at a discounted price. Be sure to check it out!

Here is my Design Team project...
Today is the last day of Spring Break and we return to school tomorrow for only 9 more weeks. Although the weather was a bit chilly during break, I have Spring on my mind. I made some M&M treats for my co-workers as a way to say "welcome back". 

I layered these paper flowers and added a brad to the center to hold them together. I adhered them to the topper in the upper left corner and then found a fun sentiment. A couple pink gems in the lower right corner to coordinate with the base of the topper and the flowers on the pattern paper.

A close-up of the pretty flower...

I used the following products from Eyelet Outlet and Brads shop.
Purple Paper Flowers
Pink Jewel Bling


Pearl Brads with gold edge
Stippled Brad with gold edge


Other Materials:
pink card stock
My Favorite Things ~ Recollection paper stack
Jaded Blossom ~ Scallop Slider and Topper Die
Jaded Blossom ~ Got Candy? stamp set
Jaded Blossom ~ Card Mat Dies
 3" X 4" plastic bag
Versafine Onyx Black ink

Eyelet Outlet and Brads has such a wide variety of products you need to check them out!
Stay Creative,
Georgiana

Thursday, October 27, 2016

Thanks for Double Sided Paper

Hello Everyone,

It is getting late here, but I just finished up a card using a sketch that I wanted to share. I have six sketches on my desktop that I plan on working on within the next couple of days, and I am hoping to get them all completed. Tomorrow is Friday and it is our annual Fall Festival. The teachers get the money for classroom materials and I would like to get some new circuit boards for the class. We started learning about electricity and what better way than with wires, batteries, and light bulbs. 

I need some thank you cards because I only have one or two in my stash. With the holidays approaching that will not be enough. Time to make more!

I used the layout from Tuesday Morning Sketches.

The papers are from My Mind's Eye ~ Remarkable stack. It is easy to combine various patterns when the paper is double sided.

The stitched circle die and flowers are by My Favorite Things. The stamped sentiment is by Craftin' Desert Diva ~ Simply Said set. I found the green ink by Studio G in my stash...something I got at Christmas time either last year or the year before. It may not be the best quality, but it matches those leaves perfectly.

The inside coordinates with the same colors and patterns.

Hope your Friday is fabulous and you find time to craft or relax this weekend. My daughter asked me to visit her at college for a day, so I am looking forward to spending a little time with her. Shopping is always a way to reduce stress...and I can't get stressed because my students need me there!

Take Care and Stay Creative,
Georgiana 

Saturday, July 9, 2016

Heat Embossing with Distress Ink Blending

Hello Everyone,

Welcome back and thanks for stopping by. After watching a few TV marathons of my favorite shows (Law and Order and Numbers) this past week ,I decided to watch a crafty video. I found one at Prairie Ink & Paper by Amy  Rysavy.  I heard her name mentioned once in a craft class I took at My Favorite Things, but didn't real know much else about her. Wow! She does fabulous work. I think I will be checking out more of her videos rather than watching TV marathons this week, especially since I only have three weeks left before going back to school.

The video I watched was Distress Ink Blending. She made it look quite simple, so I decided to try the technique again. The key...choose the right colors for blending.

This first card I used the Avery Elle stamp set Petals & Stems. I  applied heat to the white embossing powder then added the distress inks using the small round blending tool. I had about five or six different colors that all sounded great, but narrowed it down to only 3 that worked nicely together. I cut Amazing out of white foam to add dimension. In the video, Amy said she has a problem with using foam. I place mine to the side of my bottom plate (I still use my original Cuttlebug.) and haven't had any issues. Lastly, I added Clear Glitter Wink of Stella and a few sequins.

Since I really liked how the first one came out, I decided to make another using different colors and stamp (MFT splatter stamp set ~ Distressed Patterns). This used only three inks again, but the colors blended making it look like five. I added water droplets afterwards and dabbed them dry to create the splotched look. 

Lastly, I used black glitter foam and cut out the sentiment and butterfly. A trail of gems are fluttering behind.
Be sure to come back again tomorrow for my Miss Kate Cuttables daily post.

Hope you have a wonderful weekend!
Stay Creative,
Georgiana