I am so glad that my beaded pin pictorial was a hit and many people have decided to make their own. Don't forget to share your creations here.
Here is a new card I have started. I still need to add a sentiment, but I love these embellishments that I won at Fantabulous Cricutfrom Creative Charms.
I also included a two-tone pink pin. With this one, I added beads to the bottom half of the pin so no one would get poked. I used Mod Podge again.
Fun card Georgiana!! Monchromatic are not always easy to do .. .and you did
fabulous!! I would say my fav colors at the moment are pink, aqua and black. (I
think I am taking after my daughter. :-) ) Michele
Congratulations!
Please send me your mailing address (coachfans at cox dot net), so I can forward your pins. Please give me a day or two, so I can make your preferred colors. : )
Lots of exciting news coming soon...Design Team announcements, Blog Hops, another giveaway (800 followers is only 20 away!)
Have you seen all those fabulous pins attached on cards and layouts? What about the challenges that require pins to be included? Are you wondering how to make them?
Today, I would like to share a few tips to help you get started.
First, you will need to purchase a variety of beads. I would start with a couple bags to see if you will like working with pins/beads. Then remember, more beads you have the more combinations you will be able to create. I always get mine from Hobby Lobby when they have them 50% off.
Our beads (my daughter and I share) are separated by color theme for the most part. It makes it easier to choose the colors to match the project.
Next, decide on a color pattern. With Valentine's Day approaching quickly, I will be working with silver, white and red.
I chose some beads and now will layer them on a stick pin. The pins can be purchased at any craft store or Walmart. Remember to put the bead you want on the top first and work your way down. Do not add beads to the end of your pin. You will need room to attach the pins to your project (I like to attach mine into the bow.).
After I create the pattern I place the stick pins in a holder, so they can be glued. I have this small ribbon spool that is the perfect size. I prefer not to use my good pin cushion because I do not want to get Mod Podge on it.
I use an old paint brush to apply the Mod Podge. My husband asked why I had such a horrible looking brush (I think he wanted to throw it away and get me a new one.) and I had to explain it is just for glue. Be sure to apply glue to the top of the stick pin and in-between each bead. I then push down firmly so the beads will adhere to one another.
Don't forget to wash your brush while the pins are drying. Be sure to save this "glue" brush to make more pins!
Almost dry after 20 minutes...I did use a lot of Mod Podge!
Now they are done!
After they are completely dried, I wiggle them free carefully and transfer them to my pin cushion until they are ready to be used.
The deadline is January 29th and the winner will be announced on Monday, January 30th.
Have fun making some of your own. The possibilities are endless with all the colors, shapes and sizes of beads that are available. Please come back and share what you made. I would love to see them.
Stay Creative, Georgiana
Now add your project that includes pins and beads.
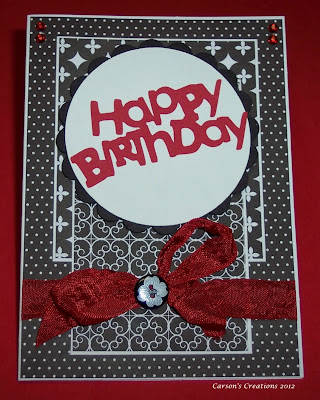
Today is our school's assistant principal's birthday. Here is the card I made for her. It was very simple to make, yet pretty.
Materials: Making Memories paper black and white card stock Spellbinders ~ Lacey Circles Happy Birthday sentiment from stash red crinkle ribbon from Karen at Little Scrap Pieces red gems black and white button
I am glad you have stopped by today, especially since I have a new card to share. I looked at my list of challenges last night and highlighted all the ones I thought I could "pile on". I am quite pleased that I used 9 different challenges for my one birthday card. Yippee!!
Materials: DCWV paper ~ Winter stack white and blue card stock Birthday Bash cartridge "Just Because" Cards cartridge Swiss Dots Cuttlebug embossing folder stick pins with blue and white beads blue ribbons white button blue ink pad
Although it is not my birthday, I thought it would be fun to giveaway 5 sets of stick pins to one lucky person. Just leave a comment and share your favorite colors. I will announce the winner next Monday, January 30th.
What are your favorite colors? Mine are brown, blue and green.
I have been selected to be a Design Team member for Creative Cutter Room. I am super excited to have this new opportunity. I am looking forward to the new challenges, the hops, and working with a new team. Our first challenge will be February 9th and I already have a bunch of ideas floating around in my head. I can't wait! Yeah!
Off to a great start this weekend and hoping the rest continues to be productive. I did take a stack of school work home with me, so I could get my planning done for the next 4 - 6 weeks. That leaves me time to craft and hop in the evenings during the week.
Well, my daughter and I watched both of the Cricut Fun videos in just one night (I think it was about 2 hours full of projects!), so I decided to use Robyn's style for a new card.
Materials:
Heidi Grace paper ~ Daisy Dear
black and white cardstock
Create-a-Critter cartridge ~ frog (p. 24) cut at 2 1/4"
Spellbinders ~ Lacey Circles
ribbon from stash
blue floral embellishments by Martha Stewart
My Pink Stamper ~ That's Punny-licious
Versafine Onyx Black ink
Thanks againDiana for all the goodies that helped make my froggie card.
Just a quick note tonight to share a few cards I made today. I had fun making them and I sure do like how they turned out. I am still trying to incorporate cuts that I haven't used before.
Materials:
Pagoda cartridge ~ fan (p. 64) cut at 2"
Wild Card cartridge ~ Just Because (p. 39) cut 4 3/4"
Walk in My Garden cartridge ~ wheelbarrow (p. 107) cut at 1 3/4"; flower shadows (p. 82) cut at 1/2"; Thanks (p. 124) cut at 1/2"
Serenade cartridge ~ butterfly
Spellbinders ~ Lacey Circles
My Mind's Eye paper ~ Lost & Found
Heidi Grace paper ~ Daisy Dear
DCWV paper stack ~ Cafe Mediterranean K Andrews stamps ~ Time Heals all things
I have one more I need to make, which will include a lighthouse (Life's a Beach cartridge).
I sure wish Blogger would be more cooperative. I have tried posting and leaving comments numerous time this weekend, but MANY times it has been unsuccessful (blank white screen). I hope it is resolved extremely soon. Please do not think I have forgotten about you!
This past week was extremely busy since it was the end of the second quarter at school. We have been working on the American Revolution, Algebraic Equations, and Energy. I had to cover all the skills and get the papers graded, so crafty time was very limited. Bummer! I am glad to end with a three day weekend.
When I found out the upcoming FCCB ~ Challenge Me Monday was a masculine card, I was almost hesitant to accept the spot. I do not make too many cards for males unless they are under the age of 10 years old (They love everything you do!), so this was a bit of a challenge for me. I was determined to give it a try. Isn't that the purpose of a challenge...to step outside your comfort zone?
I knew I had this workshop/saw paper, which I saved from Father's Day last year and I have been wanting to use it. It was just a matter of piecing it together.
I wanted to share a new card I created and I have to say I really like it. I used my favorite color, which is brown, and I tried making distressed flowers. They look good, but I am not sure how they are going to fit into the envelope. This card just may have to stay on my shelf. : )
Have you stopped byFantabulous Cricut today? I am the Sunday Spotlight Guest. How exciting! It is not quite being published ina magazine (which is one of my goals this year), but it sure is great being recognized.
It has been a busy, but productive day. This morning I did a little hopping (saw some cute banners for a pediatric unit), finished this card, and then went to the crafty stores to get a new i-rock since mine didn't work any more. The only reason I bought another one...I received some gems and stencils for Christmas that I wanted to use. If it breaks or burns out again, I don't think I will replace it.
I made this card for a student who gave me a beautiful picture frame yesterday as a late Christmas present.
Materials:
Making Memories ~ Black and White pad
blue and white cardstock
3 Birds on Parade cartridge ~ flower bird (p. 49) cut at 1 3/4"
Spellbinders ~ Lacey Circles
Winter Woodland cartridge ~ circle cut at 2 3/4" and 2 1/2"